I've owned my Omni since it was new, 1986, and I remember having these shift
rods (not the tube) fail before. It seems to me they failed on the end with
the plastic or nylon snap fitting, not the end with the rubber or plastic
bushing that fits over a ball. I say rubber or plastic because the mangled
mess that was left of the first one (and the one I later blew apart because
I wanted a template) had the look and feel of plastic. I just can't imagine
plastic having enough give to fit over the ball, but let's start at the
beginning. I was driving to an electronics auction yesterday morning when
the shift linkage fell apart passing through neutral. Pulled over and put
the mangled bushing back in again, it failed on the second/third shift when
I restarted. Tried again with tie-wraps to hold it all in place. Made it
to third gear and failed trying for fourth. So I gave up on the remains of
the bushing and slit open a piece of fuel line I had in the trunk, using
electric tape to hold it together when it slipped over the ball. Then I hopped
on the nearest highway and made it home, though I largely stuck with third
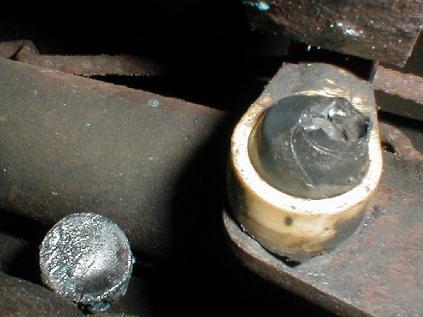
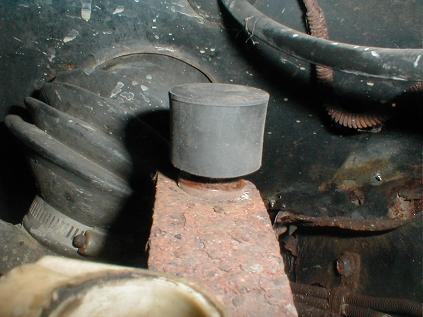
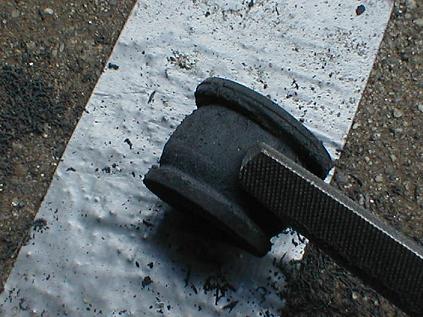
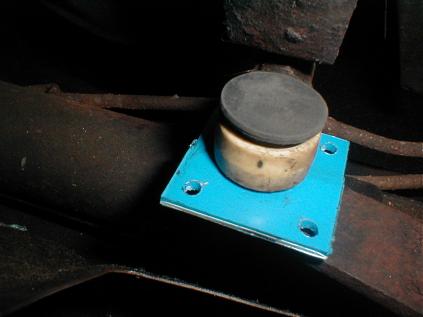
gear and burning the clutch once I got off the highway. The picture to the
right is how the kludge looked when I got home. Note the top of the old bushing
sitting on a sheet metal ledge next to it.
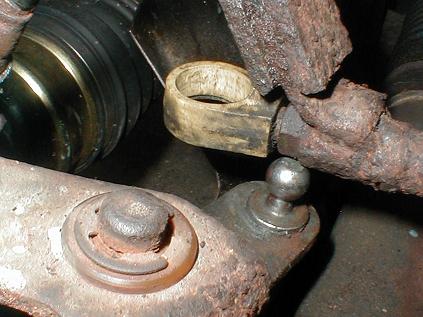
The picture to the left is just to show how simple a working roadside repair
can be. I'm not sure how long it would have lasted, and the white nylon rod
end isn't supposed to be sitting all the way down on the metal. So when I
got home, I called all the Dodge dealers but nobody can get these parts anymore.
I tried Internet search, but nobody had a source for the rods, other than
junk yards, and I'm not enthusiastic about buying 25 year old junk yard parts
that fail from age. I should mention that I replaced a couple shifter rods
that failed when the car was fairly new, maybe just a few years old, and
never had another problem with them until now. If they had failed regularly
on me, I would have stocked up, like I did with the Hall Effect magnetic
pick-up for the distributor. So I tried a few auto part stores looking for
any bushing that I might modify without any luck, and ended up at the local
hardware store where I bought a rubber stopper.
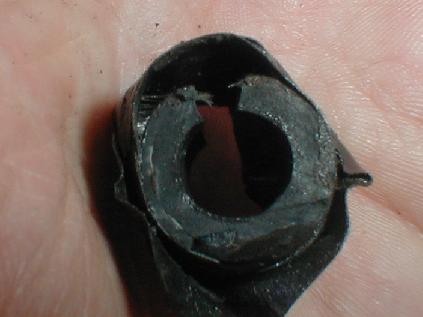
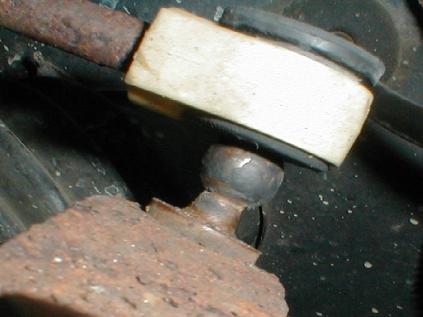
The picture to the right shows the nylon end which is bolted into the shifter
tube, but that stuff is all so rusty that I hate to touch it. I don't know
why shifter tubes rust so badly, must be made of the wrong steel or something.
You can see the nut that holds that nylon end on, but they aren't available
and it hadn't failed, it just needed a new bushing. All of the Internet fixes
I've seen for this problem suggest converting to a Heim joint, a patented
rod in ball joint type device that they sell at most hardware stores. But
you really need good access to do the job, you need to cut off the ball and
replace it with a rod or a bolt for the Heim joint to secure, and you need
to find a Heim joint that will screw into that shifter tube (or re-tap it),
since there's not a lot of room to play with. The rusty piece welded to the
rusty shifter tube right behind the nylon end is an integral part of the
shifting linkage, not something that can be ignored. I've added a few videos
to the end so you can see the shifter rods in action, and I can see where
I could install a clip or retainer without restricting motion.
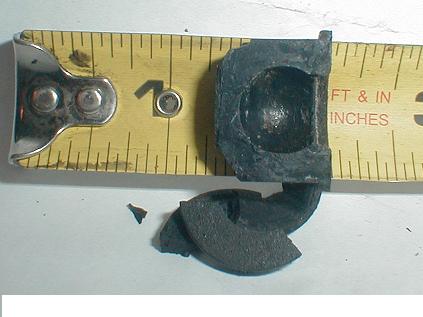
I wanted to get a better template for a new bushing than the mangled one
from the lower ball, so I tried prying off the upper shifter arm, the one
that attaches to the transaxle and is much easier to reach, just below the
master cylinder. Not surprisingly, it blew apart, but it gave me a good look
at the inside. You can't read the tape properly because of the camera angle,
but the bottom lip of the bushing is actually lined up with the 2" mark,
so the total height of the bushing is between 11/16" and 3/4". I went with
3/4" for my replacements and they were a little tall, so the factory bushing
is probably 11/16". The ball diameter is 1/2" and the opening at the bottom
of the bushing is 3/8". The lip on the top of the bushing (you can see the
fragments that broke off piled up there) was about twice as think as the
bottom lip, so let's call it 1/8" for the top and 1/16" for the bottom.
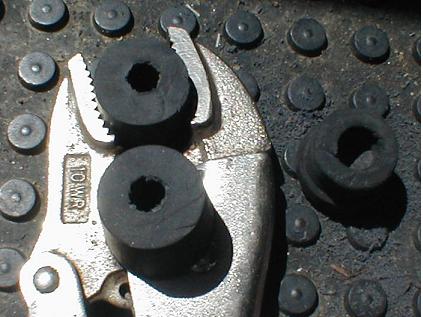
I'm going to use a couple pictures from the first bushing I made even though
I ended up doing two more. The reason is I tried constructing the first bushing
based on the mangled piece, and in test shifts, it started working it way
off after ten or so times through the shift pattern. I had used a 1/2" drill,
rather than 3/8", and I hadn't known there was a lip on the bottom. I might
never have found out except I dropped the mangled bushing at some point and
it fell down behind the battery and dropped alongside the overflow reservoir,
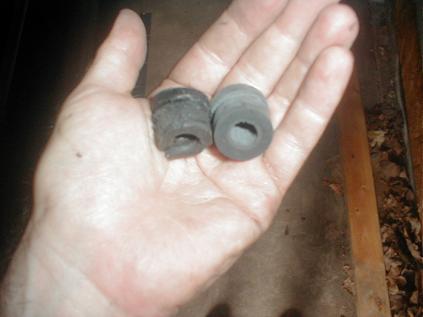
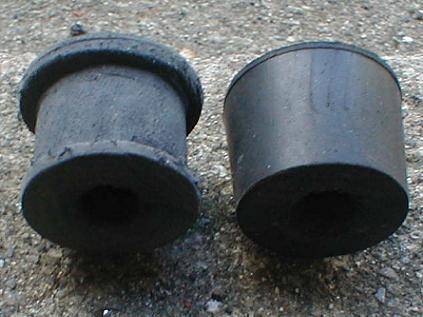
which I didn't feel like taking out. To the right you can see the mangled
bushing next to my first replacement, it was pretty tough getting measurements
from that mess. The replacement is made from a solid rubber stopper (0.95
cents at the hardware store), the 1-1/16" size, which I drilled out and filed
down to the proper diameter, about 7/8". But like I mentioned, I drilled
the hole too big because I thought that's what the original hole on the mangled
piece measured. The rubber drills super easy, I used visegrips to hold the
stopper and worked through a few drill bit sizes to keep on center. I also
taped the drill bits at 1/2" for the depth, though I think 9/16" should be
the final depth.
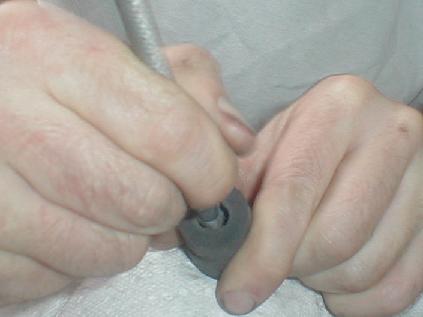
Sorry about the contrast on the picture to the left, it's the best one I
had. It shows using the round file to cut a hollow, with duct tape protecting
the edge of the hole. The file end was pretty sharp and the rubber can be
basically ground into dust when you go at it hard, gouging with a circular
motion. In fact, the wearability of these rubber stoppers is my main concern,
I wish I could have found a harder rubber to work with, but I suppose stoppers
are supposed to be soft. And as pointed out before, the hole drilled in this
stopper was too big, 1/2" rather than the 3/8" I later measured off the newly
broken bushing. You'll see the difference with my next attempts directly
below: I did the gouging out near the car and tried frequent fittings so
I wouldn't overdo removing material. As soon as I could get it to sit on
the ball, I stopped. The test fitting of the rubber stopper, soon to be a
shift rod bushing, is shown below.
You can also see in the picture to the below that I didn't do a good job
centering the holes in my second set of bushings. The reason is I skipped
to many drill bit sizes going from the 1/8" pilot hole which was close to
dead center. Since the rubber is soft, if you skip too many drill sizes,
it's easy to end up cutting in on an angle. Too compensate, when I hollowed
out a rough 1/2" ball shape with the file, as I was doing above, I tried
to hollow more on the fatter side of the stopper. I should also mention that
the stoppers were pretty long, around an inch, so before I even began with
drilling, I cut around a 1/4" off the narrow end with a razor knife. It would
have been easier to file to the final diameter if I had used the narrow end
of the tapered stopper, but I wanted to make sure there would be enough rubber
for a bottom lip on the bushings.
I actually held onto the rubber stopper (below) all the time with my left
hand while I was filing, but allowed it to roll a little at the same time
to keep a round shape. Wore a nice blister on my left thumb before I wrapped
the thumb in duct tape - is there anything duct tape cannot do? I'm working
on the first on my final two bushings here, so I hadn't nailed down the technique
completely. By the end, the easiest way to do these I found was to use the
sharp edge of the three-sided file (triangular taper) to cut a groove all
the way around the stopper at the distance I wanted from the edge to form
a lip. Then go around again and again leaning the file inwards, so you end
up with the right shape but humped up in the middle. After, I used the circular
rasp to cut a deep groove around the middle, then filed away the remainder,
going around and around, with the triangular taper.
Directly below you can see the nearly finished bushing next to a rubber stopper
that's only been drilled and cut to length. I ended up needing to take some
meat off the diameter of the lower lip to get it through the nylon rod end,
even after lubricating generously with spit:-) The picture to the lower right
shows the homemade bushing after it's been installed in the shifter rod end,
right before I mount it on the ball. You can see that the extra 1/16" I gave
the bushing on length, making it 3/4" instead of 11/16", came back to bite
me with a gap of about a 1/16" at the top. I suppose I could have measured
the area I was filing out, but I figured I could do the 1/8" lip and the
1/16" lip by eye. Hopefully, it's not a fatal flaw. I suppose I could try
pulling the two joints apart and adding plastic shim washers, but they don't
come apart easy at this point. The bottom left shows the test fitting the
stopper before going to the work of shaping the bushing. I think it's sitting
around the correct height there, it's supposed to get a soft washer underneath.
Bottom right is a picture of test fitting a stopper on the ball before filing
into bushing shape.
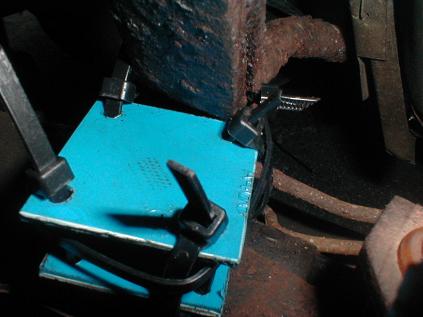
After driving around for a hundred or more shifts, it seemed to me that the
lower shift arm, the one at the end of the shifter tube, was lifting up a
little from the ball. Rather than wait to see if it would pop off in traffic,
I cobbed on another kludge, which should keep the whole business together
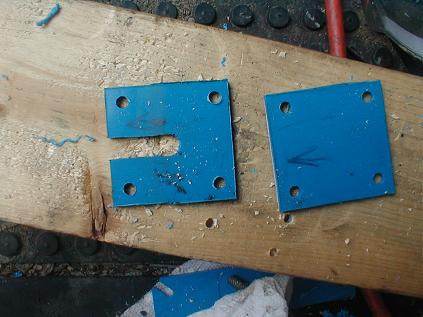
for a goo while. It's 1/8" plastic from an industrial electrical box cover,
with slot cut for the ball shaft. I could have done a keyhole rather than
a long slot, just wasn't thinking. In any case, it when on fine (below) and
I secured it with a serious wire tie at each corner and one around the outside
to prevent any possibility of it backing out through the slot. The shifting
is smooth as silk now, for the first time in years, so I'm hoping I'll notice
it getting sloppy if the rod gets loose again. For the previous year, the
only way to get first gear was to go through second and keep the shifter
hard to the left (pulled towards the drive) and even then, it sometimes took
multiple tries. If I had thought of it ahead of time, I would have left a
little slack in the four corners at the top and run a big tie wrap through
the two in the foreground (away from the upright on the shifter tube) and
that secured that tie wrap around the shifter tube. Would have left no room
for motion, except on the ball shaft.