
- Step 1: Preparing the case
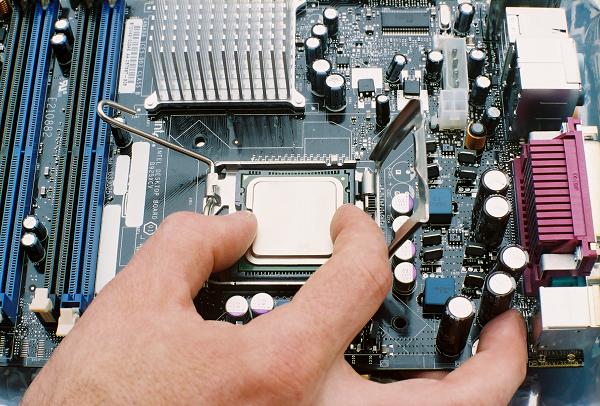
- Step 2: Installing the CPU
- Step 3: Installing RAM
- Step 4: Installing the Motherboard
- Step 5: Making Motherboard Connections
- Step 6: Installing an SATA two drive array
- Step 7: Installing Adapters, Nvidia GeForce PCI Express
- Step 8: Finishing the hard drive array
- Step 9: Installing the DVD recorder
- Step 10: Closing up and CMOS Setup
Copyright 2018 by Morris Rosenthal
All Rights Reserve
Build Your Own PC - An Illustrated Step by Step Guide to Building a Computer
I've finally regained the U.S. rights to my bestselling "Build Your Own PC" series from McGraw-Hill. I'm working to put the last edition online while I decide whether or not there's really any interest in PC building books these days. When the books were selling strongly, there was so much competition in the new PC market that you couldn't save much money by building your own basic PC (a high performance gaming PC was always a different matter), but these days everybody wants laptops and the few large PC manufacturers still in business charge pretty much what they want. So you can save a good deal of money building your own custom PC these days, it's just buying Windows at retail that will kill you if you can't get a discounted "For New PC Only" version through a parts supplier. I also have six PC hardware troubleshooting flowcharts and six laptop hardware troubleshooting flowcharts on this website.
While it's been years since the last edition of the book appeared, very little has changed in terms of technology, so the large collection of step-by-step color photos and instructions remain relevant today. What's primarily changed is the number of cores per CPU, which adds a few hundred legs (pins) to the CPU package and socket, but not much else as far as the PC builder is concerned. The SATA hard drives used today are a little faster but the connections are the same. The DDR4 memory is a couple times faster, but unless you have a good eye for measuring the alignment notch position on the module, they look identical to the last two generations, DDR3 and DDR2. Power supplies have all the new connectors today instead of being forced into adapters and the PCI Express adapters can run at higher speeds. But it all fits together the same way.
I'm skipping all the text about PC technology basics and parts shopping here, let me know if you're interested in that stuff and I'll consider updating those chapters and posting them.
I made the photos for the step-by-step guide to building a computer a little smaller to accommodate smaller screen devices, but more than large enough so you won't be squinting at the details. What made my Build Your Own PC series so successful was the exhaustive photographic approach, I didn't leave out any steps unless they were duplicates, like putting four screws in a drive. The idea was to give new computer builders confidence so they wouldn't be left with nothing but the tiny instruction pamphlets in bad English to follow. In any case, I hope you enjoy the guide and if I get enough feedback, I'll do a complete update in the Fall of 2011.
So if you want to know how to know how to mount a CPU and a heatsink, how to install the motherboard in the case, how to make power supply connections,and how to mount and connect drives, you'll find the illustrations very useful. And the illustrations are all in order, not just a collection of hardware photographs, and thanks to building and repairing thousands of PC's, I'm doing it in that order for a reason. I would never wait until the motherboard is installed in the case to install the CPU and mount the heatsink and insert the RAM modules. It's simply much easier to do it outside of the case where there are no obstructions and you can really see what you are doing. Likewise, it makes no sense to build a PC with two or more hard drives by installing and connecting those drives one at a time, or waiting until the case is fully populated with components to try to install cooling fans.