
Finding an open or short circuit
Copyright 2016 by Morris Rosenthal All Rights Reserved

Fun, intelligent SciFi without wars or potty-mouth heroes.
- Diagnosing Ticking Noises
- Car Won't Start Flowchart
- Engine Overheating Diagnosis
- Brake Problem Flowchart
- Troubleshooting Car Steering
- Finding Short Circuits and Electrical Failures
Troubleshooting car wiring and electrical problems for ignition switch, lights and motors
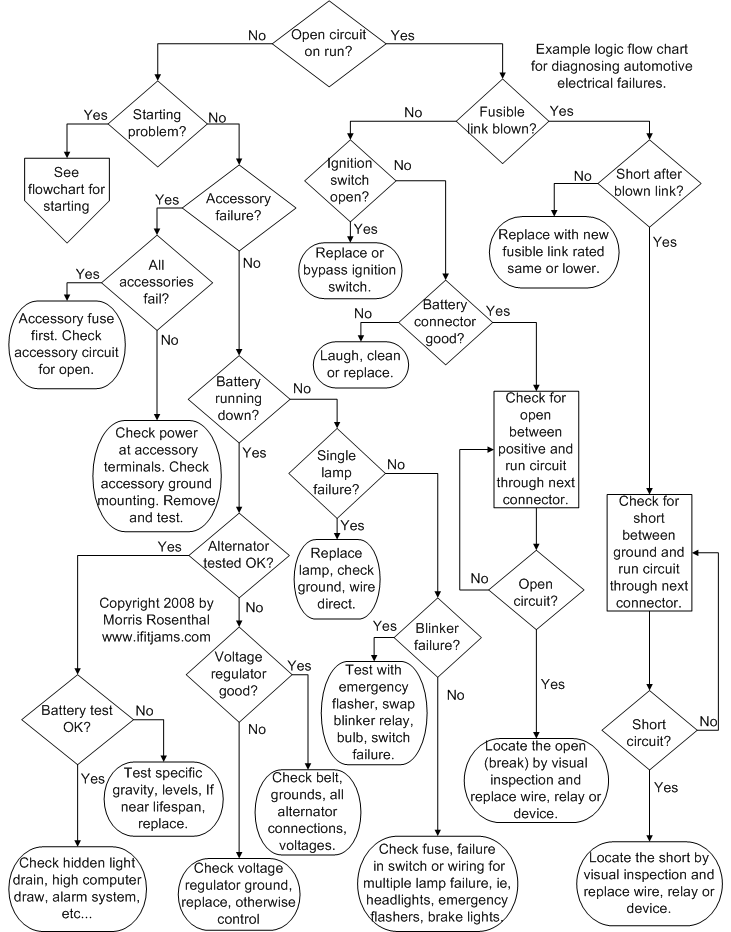
Is there an open circuit with key on "run"? The ignition switch in the car is just like any other low voltage, multi-pole electrical switch, except it's turned by a car key rather than a knob or paddle switch. Ignition switches usually have four basic states: Start, run, accessory and off. Note that many systems are live in the "off" position, which is why you should always disconnect the battery ground when working on the car. When you turn the key to the "start" position, you have to hold it in place against a spring force, and as soon as you relax, the key will return to the "run" position. The main difference between "start" and "run" is that the "start" position powers the starter motor and the solenoid that kicks the starter gear into the flywheel. If you keep the key to start while the car is running, you'll burn out the starter, and very likely burn up some wiring as well as it's not sized for continual operation at the high current draw that the starter requires.
The "run" position turns on all of the electrical systems in the car, except for the starter circuit. On older cars, the only critical electrical circuit required to run the engine is the coil circuit, which creates the high voltage for the spark plugs. You can pop start and run an old car with a weak battery, no alternator, no functioning circuits other than the coil circuit, which demands very little current. If you're driving around just fine all day, and then the car dies a few minutes after you turn on your headlights (which grow dimmer by the second), it's a good bet that your charging system isn't working.
So when you turn the key to the "run" position, you should see around 12.6 volts at the positive terminal of the coil. If you don't see any voltage, it means there's an open circuit somewhere between the positive terminal of the battery and the positive terminal of the coil. That open circuit can be in the wiring between the battery and the ignition switch, or between the ignition switch and the coil. The only tool you need to troubleshoot car wiring problems is a simple multimeter, either digital or an old analog meter with a needle, as comes with some ignition timing kits. You can buy a super capable seven function digital multimeter for $2.99 or $1.99 at Harbor Freight on sale, expect to pay closer to $10 at a general retailer.
Return to Wiring Diagnostic Chart
Is this a starting problem. While the starting circuit includes the running circuit, this flowchart is for troubleshooting running problems. If all of the accessories work fine with the key in the "run" position, ie, windshield wiper, heater blower, radio, etc, and the car won't start, you have a starting circuit problem. It may turn out that the car won't start due to a failure with a run circuit component, such as the coil, distributor or electronic spark control computer, but those possibilities are covered on the flowchart for when the car won't start.
Return to Wiring Diagnostic Chart
Is the problem and accessory failure? Devices such as the windshield wipers, heater blower and radio are considered accessories by some manufacturers, and they generally operate on the "accessory" as well as the "run" switch postions. Rear window defrost and power windows are also accesories, while power door locks are one of the circuits that operate even if the ignition switch is turned off. And we're talking about electrical failure here. If you turn on the windshield wipers (with the car not running so it's quiet) and you hear the electrical motor running but the wipers aren't moving, it means that there's a mechanical linkage failure between the motor and the wiper arms, not an electrical problem. If you hear an odd noise when you run the defrost blower, it may be some leaves or paper in the vents, it may be bearing failure, but it's not electrical. A power window that makes noise but doesn't go up or down or a lock that goes "click" without locking or unlocking doesn't have a power or wiring issue, those are all mechanical failures.
Newer cars have large numbers of relays, in addition to fuses and fusible links.The purpose of an electrical relay in a car is to switch a higher current than you want wire all the way back to the stalks on the steering column, not to mention the heavy gauge wire and heavy duty switches that would be required. So the circuit that runs from the ignition switch to the relay actuates the relay which the connects the battery current to the device. Older cars may only have one relay in the car, the motor starter relay switch, which allows the ignition start circuit to connect the battery with the starter, while newer cars may have a dozen or more relays for all of the power options.
Return to Wiring Diagnostic Chart
Have all accessories failed? For a single accessory or device failure, the first thing to check is the fuse. Your owners manual (the little book that lives in the glove compartment) will show you the location of your fuse box and the layout of the fuses. The layout is important, because if you're lying on your back with a flashlight, your feet in the back seat, trying to figure out which fuse you want to check, it helps if you already know where it is. Otherwise, you may not figure out whether the labels go with the fuse above or the fuse below the label. You check the fuse by disconnecting the battery ground for safety and then removing it and visually checking if the flattened wire in the plastic section is still intact. If you can't tell by looking at it, use your multimeter to make sure there is continuity through the fuse. You may need pliers to pull out the fuse if it's hard to grip, just don't break anything. A decent fuse box comes equipped with spare fuses for the different current ratings, 5 Amp, 10 Amp, 20 Amp.
If the fuse is good, the next step is to check for +12V on the input terminal of the accessory, motor, whatever. If the 12 volts is present, check that the device is grounded. It may have a separate ground wire or it may be grounded through attachment to the metal car body, all of which is at ground. If the accessory has power, ground, and still doesn't work, the only possibilities are that the device has failed or the switch on the device (like the power button on a radio) has failed or is turned off. As long as there is power to the accessory, the ignition switch isn't the problem.
Return to Wiring Diagnostic Chart
Is the battery running down? If you park any modern car for a few months without disconnecting the battery, it will run the battery down just based on the current draw of the clock radio, computer, and any other "always on" devices. If the battery runs down in just a few days, it's likely that you have a failed "always on" device that is drawing too much current, or a mechanical switch problem. A mechanical switch problem on a light for a trunk or a glove compartment can cause the battery to run down in a few days or a couple weeks, depending on the size of the bulb and the state of the battery. Do not get into your trunk and close the lid to find out if the light turns out, you can die that way. Just pull the bulb and see if the problem goes away.
Return to Wiring Diagnostic Chart
Does the alternator tested OK? So this first logical question if your battery is running down is whether or not it's charging in the first place. The simplest test for the charging circuit is to test the battery state with your multimeter while the car is running, usually on the 20V DC scale. The voltage should be well over 13 volts if the battery isn't fully charged, depending on the car. If this voltage isn't present, the problem could be anything from the ground, to the state of the battery connectors, to the alternator, voltage regulator, or computer.
Before you worry about testing the alternator, check the drive belt. If the alternator isn't getting turned at high speed, it's not going to be able to charge anything. The output of the alternator is a bridge rectified AC, pretty choppy, that will read funny on an AC meter setting, something in the tens of volts, since AC meters are designed for 60 Hz RMS. Almost all chain auto parts stores are set up with a battery/charging tester they can wheel out to the car if you drive in. If you have an alternator with one failed diode that's putting out enough current to keep the car running fine but not enough to keep the battery charged enough to start the car in cold weather if you only take short trips, it can be rebuilt. But if you can't do it yourself, the rebuild fee may well be higher than the cost of an after-market replacement, so get quotes. Old alternators had bridges built from individual diodes that could be replaced for a buck, newer alternators use a potted bridge rectifier assembly, you have to replace the whole thing if one diode fails.
Return to Wiring Diagnostic Chart
Does the battery test OK? If the charging system is functioning and the battery is running down, either there's an unplanned draw or the battery is failing. There are a couple of home tests you can do on a battery. One is the specific gravity test, that checks the acid condition in a battery, assuming the cells can be opened. The specific gravity tester is just a little syringe with different density plastic balls inside in a row. You suck a little battery acid into the syringe, and refer to the chart that tells you the condition based on how many balls float. Another home test is to check the DC voltage. Turn the headlights on for a half a minute, and then turn them off for a minute or two and check the battery voltage. If the voltage drops below around 12.6 volts when the battery is supposedly fully charged, it's getting old. If the battery shows on the order or 10V and burbles away while it's charging, you have a bad cell. If the battery is within a couple months of its expire date, either before or after, just replace it. batteries are pretty well engineered these days, they rarely outlast their warranty.
But if the battery tests fine or you've already thrown in a new battery or exchanged batteries with your other car, and it still runs down, you have an bad drain on the battery. If it runs down while the car is just sitting, that means you have a drain in one of the "always on" systems. Get on Google and check your car model for the standby power drain on the computer, clock radio, etc. If it's in the hundreds of milliamps, that may be the problem if the battery runs down in just a couple weeks. A poorly designed or installed car alarm system may have the same effect. You can check the standby power drain on the car by inserting an multimeter with a sufficient DC amp rating in the positive circuit, by removing the positive battery connector and inserting the meter between the battery and the connector. DO NOT START THE CAR OR TURN THE IGNITION KEY FROM "OFF" OR YOU"LL MELT YOUR METER. This is strictly a leakage or standby drain test. Many meters will offer a special "unfused" connection for measuring DC Amps in the 2 amp or 20 amp range. Don't stand their staring at the metter, touch make the connection with your probe, read the meter, and disconnect, it's not designed to dissipate power over a long interval.
Return to Wiring Diagnostic Chart
Is the voltage regulator good? The voltage regulator controls the amount of current flowing to the rotor field windings, which transform the rotor and it's iron core into an electromagnet. As the pulley spins this electromagnet inside the stationary windings (stator) of the alternator, current is induced in the stator, which is used to charge the battery. In order to prevent the battery from being overcharged and overheated, the voltage regulator monitors the circuit and limits the current flow to the alternator to a safe level. This is necessary because the alternator has no transmission, ie, the speed the rotor turns is controlled by the engine RPM and nothing else. If you didn't have a voltage regulator limiting the current to the rotor on the highway, the battery would soon be overcharged. And since the alternator is doing real work when the rotor is energized, an "always on" alternator would have a negative effect on gas mileage, like an air conditioner.
Newer alternators use an internal voltage regulator, which makes troubleshooting a hassle, basically a "swap the alternator" job unless you can identify the terminals on the outside of the alternator that will allow you to monitor the activity of the voltage regulator, ie, the input to the field windings on the rotor. Older cars use external voltage regulators, which are usually two wire devices that can be easily checked for a dead short or open. External voltage regulators are normally grounded through their mounting on the firewall, so cleaning up the bolt and remounting can't hurt. You can check the 12V input to the voltage regulator with the key on "run" and monitor the output of an external voltage regulator with your meter with the engine running, the important thing is that it's positive and changes with engine RPM and time. External voltage regulators are a cheap part, internal voltage regulators require opening up the alternator, and may be priced to encourage you to purchase a new alternator.
Return to Wiring Diagnostic Chart
Has there been a single lamp failure? If you have a headlight out, a taillight, a brake light or a blinker (turn indicator) that doesn't come on even though it flashes on the dashboard, you probably have a bulb failure. If replacing the bulb doesn't fix the problem, use your multimeter to check if the bulb socket is getting 12 volts DC when the bulb is supposed to be on. But be careful, its very easy to touch the socket ground and the +12 volts at the same time with your probe, causing a short. Best bet is to wrap your probe with electrical tape, all except the very tip. If it is getting 12 volts, make sure you are seating the bulb in the socket correctly, some of them are pretty tricky, with push and turn, and require some force. If the socket isn't energized, the failure is either in the wiring or the switch.
In the case of paired lights, like the headlights or tail lights, if one works, the switch is good so the problem is in the wiring, frequently the socket ground failing due to corrosion. If a paired set of lights has failed, the switch is the best guess, but check the wring diagrams to make sure they aren't using a common wire. The problem with new cars, with all the lights being controlled from a stalk on the steering column, is that the switch replacement is expensive and a pain in the behind that you don't want to try without a decent manual for the car. The brake lights and reverse lights have separate mechanical switches on the pedal and shift assembly respectively, so they are less expensive and easier to replace. One trick with brake lights is to remember that they are wired through the turn signals. So if you have a problem with a brake light, it may be a fault in the turn signal circuit.
Return to Wiring Diagnostic Chart
Is the problem a blinker failure? You only need one turn signal flasher to cause the left or turn signals to blink, since they go one at a time. When the flasher fails, the turn signal won't make its characteristic sound, and the lamps will generally stay off, though I suppose there may be an "on" failure possible as well. Flashers are thermal switches in which the heating of the switch as electricity flows through it causes the mechanical connection to break, allowing it to cool and make contact again, repeating the process as long as the turn indicator is on. Another flasher drives all four lights for the emergency blinker circuit. Some emergency blinker circuits won't work properly if any of the four bulbs have failed, so check all four blinkers before replacing the flasher.
If the flasher stops working, you can check that it has 12 volts coming in when the turn signal is on. If it doesn't, the first check is the fuse, but the next step is to replace the flasher, since troubleshooting the wiring and the turn signal yoke switch is not only difficult, but an outcome you are hoping to avoid:-)
Turn signals set on the column are supposed to automatically release when the wheel returns to straight. On very gradual turns, this may not occur, and it's not considered a failure. However, if you replace your turn signal yoke on the column and notice that your turn signal to one side or the other now releases stubbornly or not at all, it may be a question of having overtightened one of the little bolts holding the yoke in place, or a missaligned release for a cam or trigger to hit. If you still have the steering wheel puller, it's worth taking it apart again and checking the torque on the bolts, if not, you should develop the habit of taking the turn signal off manually, or you'll drive everybody else on the road nuts.
Return to Wiring Diagnostic Chart
Has a fusible link blown? Fusible links are the fail-safe, the last line of electrical system defence in many cars. The fusible links are located very close to the battery, in the individual power circuits for running the car. If there's a short circuit that doesn't pop a fuse box fuse, either because the circuit isn't routed through the fuse box or because the fuse has been replaced with an oversized fuse (or a piece of wire), the fusible link will melt and open the circuit. You may be able to visually identify a blown fusible link by melted wire insulation on one of the bundles of wires between the positive battery terminal and the first major connection block, heading towards the ignition switch.
Return to Wiring Diagnostic Chart
Is the ignition switch open? If all of the fusible links in the ignition run circuit are healthy, it means you should be getting full battery voltage to the ignition switch. Rather than messing around with the multimeter probes under the dashboard with a live circuit and the chance of causing a short, it's safer to dissconnect the battery ground and check for continuity on the positive circuit. Your multimeter may have a continuity setting that makes an audible tone or beep when the meter detects a closed circuit (a successful wire path) or you may have to use the lowest resistance setting and look for a resistance of below 1 Ohm. The audible continuity function is very useful because you can concentrate on where you are putting the probes rather than looking two places at once. A length of wire with alligator clips that you can reach to the positive battery connector is handy, using one side of a set of regular jumper cable for the battery works fine as well, as long as they close good enough to hold a slender multimeter probe. If you determine that the ignition circuit (wire on one side of the switch to the other for the circuit) remains open when the key is turned, you have an ignition switch failure.
If the circuit between the battery and the ignition switch is open (no continuity), go back to the engine compartment and check for continuity through the main connection block, which means separating the connector and sounding out the circuits on the side with the wires heading back towards the positive terminal on the battery. If you find a blown fusible link at this point, just move over to the right on the flowchart. It is very, very useful to have the shop manual wiring diagrams at this point, or at least, a decent aftermarket manual drawings for identifying wire colors and paths. Without the wiring diagrams, it's difficult to determine which wires are supposed to be connected directly to power, which through relays and switches, and which carry signals rather than battery voltage.
Return to Wiring Diagnostic Chart
Are the battery connectors good? Don't laugh. If the car doesn't start and you have no power to anything, check the battery connectors and make sure they haven't corroded to the point that there is an insulating layer of smegma between the battery post and the connector. If the wires aren't molded into the battery connectors, it's also possible that the clamping surface of the heavy gauge wire to the connector has corroded to the point that that circuit is open. See my page for replacing car battery connectors.
Return to Wiring Diagnostic Chart
Is the failue an open circuit? This is the final step in searching for an open circuit, and it's an iterative process, ringing out each stage of the circuit between any connector blocks. On older cars, you may find that the wire from the battery to the coil, for example, goes straight from the battery to the ignition switch to the coil with no other connections, which makes it a trivial process. In fact, I accidentally hot wired my 1967 Mustang some thirty years ago when rewiring the car by accidentally leaving the ignition switch out of the circuit. Once the car was started, it wouldn't stop when the key was turned off.
Start by removing the negative battery connector so there's no potential of completing a circuit accidentally and turning the key to the run position. Whatever circuit you are troubleshooting for an open, start at the positive battery connector, and check the continuity to the end point of the circuit (ie, the device that isn't getting power, such as the coil). If you have continuity, either the ground on the device is bad, or the device itself has failed open (like an internal short having melted a wire inside). But assuming that you don't see continuity, since this is a test for an open circuit, start working your way back towards the battery, by checking the continuity at the next accessible point, which is usually a relay or a bulk connector. On newer cars, there may be a half dozen or so bulk connectors, plus the ignition switch, between the device and the battery. When you regain continuity, you know that the open circuit is between the last two access points you checked, the one where you had continuity and the last one where you didn't. At this point, you have to unwrap the wire bundle so you you can physically inspect every inch of the path and look for a break or a failed splice or connection that you couldn't access before.
Return to Wiring Diagnostic Chart
Have you checked for a short after a blown link? Don't just replace the blown fusible link without checking if it blew due to a short circuit that is still in effect. A short circuit, by definition, is a circuit with an unexpected path to ground, meaning the electricity will return to ground without powering whatever device the circuit is intended to power. The way to test for a short circuit is to check for continuity (or low resistance) with your meter between ground and the supply line (where the +12 volts is supposed to flow) in the circuit. In order to safely test for a short circuit using convienient bare metal as ground, it's easiest to leave the ground to the battery connected and remove the positive battery connector. But make sure you keep it well away from the positive battery terminal when it's off, or cover the positive battery terminal with a plastic cap or a heavy insulating sheet. When you are sure the positive battery terminal is disconnected and isolated, you can turn the ignition key to "run" and check for a short from the other side of the blown link to the battery ground or to any bare metal spot on the car.
If there isn't short on the other side of the blown fusible link, there are a couple of possibilities. First, there may have been a temporary short circuit that blew the fusible link and is no longer in place. This is most likely if you had been working on the car without disconnecting the battery ground. Next, the device that developed a high current draw, perhaps an internal short, may have failed open at the same time that the slow blow fusible link did it's job, albeit too late. The fusible link may have been defective and slowly failed with time, or the insulation may have been compromised letting the wire corrode and increase the resistance. Last, there could be a short in a circuit that is only inline when a relay is powered and closed, you'll have to determine that from the particular circuit the blown link is in. When you replace a fusible link, do it with an exact replacement, or if you can't get one, a fusible link of a slightly lower rating. Better to have it blow too fast than not at all. Don't try splicing it in without cutting the blown link back. Cut off as much wire as you possibly can (leaving room for a splice) heading towards the ignition switch, and go back to the other side of the main splice for all of the fusible links on the battery side.
Return to Wiring Diagnostic Chart
Is the problem a short circuit? Locating a short circuit is very similar to locating an open circuit, except you are searching for continuity to ground on a supply wire, where you'd expect to see 12 volts, as opposed to looking for a break in the circuit back to the battery. Start at the ignition switch side of the blown fusible link, with the positive disconnected from that battery and insulated from accidental contact as described above, and with the ignition key on "run" check again for continuity between the supply wire and and a convenient ground spot on the car. Follow the shorted wire to the next connector, undo the connector, and locate the wire on the other side by the color coding or connector numbering. If the wire on the other side isn't shorted to ground, you know that the short is physically located between that connector and the last place you checked. Otherwise, proceed to the next connector or access point, and check again for the corresponding wire being shorted to ground. Just keep moving forward until you find the circuit stage that's shorted.
If the short only appears at the end of the circuit and is in the device, such as a motor or a sensor, than that device has melted down and failed in a shorted state, so it has to be replace. However, if the short appears in one of the intermediate stages, in the wiring bundle, you'll have to unwrap the bundle and visually inspect the wire all along the section where you know the short must be. You really need to check minutely if it's not obvious, the hardest shorts to detect are those where the wire insulation has failed on two adjacent wires and they are touching side by side, or where the insulation was compromised alongside the firewall and the facing side of the wire looks normal. When you locate the shorted wire, assuming it's not broken, simply wrapping it in electrical tape will usually suffice if the fusible link, which you can now replace, did its work well.