 Laptop
Repair
Laptop
Repair
- Laptop Power Flowchart
- LCD Problem Flowchart
- Laptop Battery Charging
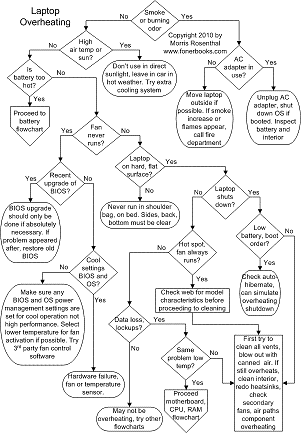
- Troubleshooting Laptop Overheating
- Wireless Internet Connections
- Laptop Hard Drive Failure
- Extending Laptop Battery Life
- Buying a Second Hand Laptop
Copyright 2018 by Morris Rosenthal
All Rights Reserved
|
|
|
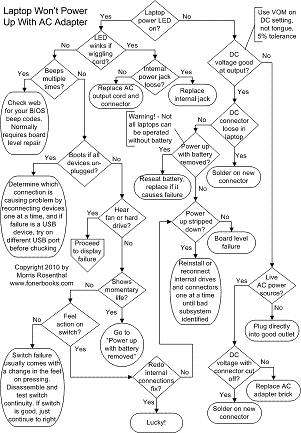
Power Failure
The troubleshooting process always starts with identifying what works. If the problem is power related (whether battery or a question of the laptop not turning on) the first step is establishing that power is getting to the laptop. This means checking that the LED on the transformer brick is lit, and if it isn't (or doesn't have an LED), that it's plugged into a good power outlet. You can check that by unplugging the transformer and simply plugging in a lamp. Some of the oldest notebook models have an internal transformer, so the line power (110 VAC in the U.S., 220 most other places) goes directly into the laptop body. The next question is whether or not any of the little LED status lights on the laptop light up with the power plugged in. Even the oldest models usually have a power good status light. If you have positive power status and the notebook simply won't turn on, the next check is the battery. Some models of notebooks will not operate without a good battery installed, but most will, so Google up your particular model with a search like "operating without battery" and find out if your laptop will operate with a dead or missing battery. If the battery isn't an issue and the laptop still won't turn on one with the power good status light lit, it could be a switch failure, but it's more likely a power regulation or mainboard failure. Troubleshooting power regulation or the motherboard requires test equipment or spare board to swap out, and is beyond the scope of these articles.
|
There's very little difference between troubleshooting a Dell Latitude, Toshiba
Satellite, Sony Vaio, IBM Thinkpad, HP Pavilion (and Compaq) or even an Apple
Powerbook or iBook. The basic designs of all of these laptops are the same,
even if one model uses an Intel CPU, another an AMD,a third a PowerPC and
a fourth a low power Transmeta. A technician troubleshooting Toshiba laptops
may be more like to start with the battery, as they are notoriously weak,
just as troubleshooting HP and Compaq notebooks often begins with the RAM.
However, it's a mistake to approach any notebook problem with a preconceived
notion of the outcome rather than following a logical process of elimination.
Just because one model of Dell tends to blue blotches on the screen when
it ages doesn't mean that Dell kept manufacturing notebooks with the same
problem. IBM and Sony and Apple laptops have generally been viewed as the
higher quality than the more popular brands, but they all suffer similar
failures due to overheating, wear and tear, and the occasional run of bad
components.
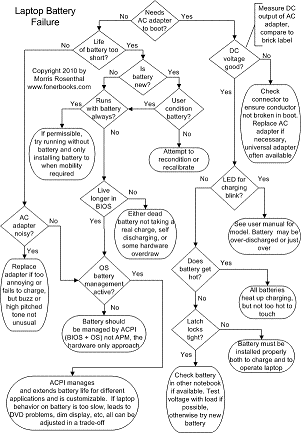
Battery life is special subset of power problems that has as much to do with poor designs as actual component failure. The older NiCd batteries were particularly susceptible to "memory" issues. If not full discharged after every charging, the battery cells begin to remember their previous charge level as a new maximum, and some individual cells may even reverse polarity while the batteries are being charged. Ni-MH (Nickel Metal Hydride Battery) which replaced NiCd (Nickel Cadmium) for standard models are somewhat better, but they can't fight poorly designed charging circuitry or bad software controls. All laptop batteries, whatever the shape, consist of a number of low voltage cells connected in series to reach the required operating voltages. You can rebuild a notebook battery (it voids the warrantee:-) but it's usually not cost effective. |
It pays to go online and read the owners manual for extending the life of the battery in your particular laptop model if you didn't do so when you obtained it. Some older notebooks require that you cycle the battery continually, only working on AC power for as long as it takes to recharge the exhausted battery. Many newer models want you to fully discharge the battery around once a week, but otherwise don't care about leaving it plugged in the rest of the time, and newest designs don't care what you do as long as the laptop actually gets run on battery for a reasonable percentage of the time. If you think your battery is running down too fast, make sure you have enabled the aggressive power saving modes in software (usually accessed through Control Panel or the manufacturers icon) which dim the screen, slow the CPU, and let the hard drive spin down when unused. Also, keep in mind that the level of estimated battery life remaining that causes an onscreen alarm can be set by the user, and if your default setting is very conservative (between 10% and 20%), you may want to experiment with a lower level (between 3% and 5%) that will still give you time to save your work and shut down before the laptop goes into hibernation.
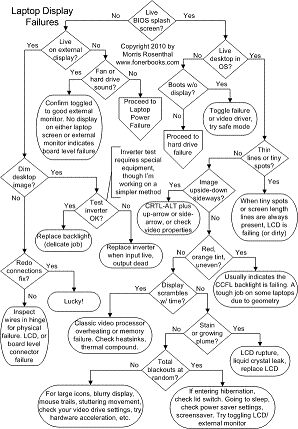
Video Failure
The first thing to check in cases of complete video failure is the power status, as detailed above. If you can always hear your laptop fan when you turn on the laptop and now you can't it's not a video failure, it's a power or mainboard failure. The next troubleshooting step is to connect an external monitor with a standard VGA connector, whether a CRT or an LCD. If your notebook won't light up the external monitor, it's extremely likely that either the motherboard or the internal video adapter (if it's not part of the mainboard) has failed. If the video adapter is a discrete component and you can find a replacement for under $100, it might be worth gambling on replacing, but it's almost never cost effective to replace a mainboard. There is a small chance that the internal connection to the external video port has coincidentally failed with the laptop's own video subsystem, but it's not all that likely.
.
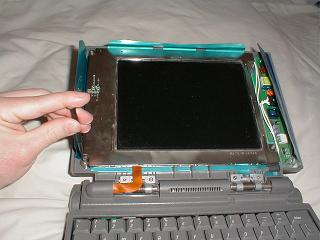
If your screen brightness seems to flicker or sometimes is bright and sometimes almost fades out completely, even then the unit is plugged into the wall (don't get fooled by power saver mode), then you probably have a failing inverter or backlight. Between the two, the inverter is several times more likely to fail, it plays the role of the solid state ballast in modern fluorescent lights. The backlight itself is a CCFL (Cold Cathode Fluorescent Lamp) with a very long meant time between failure, while whole generations of inverters have been lemons on some laptop models, you can easily research your model on Google.
|
Laptop Fan
Failure
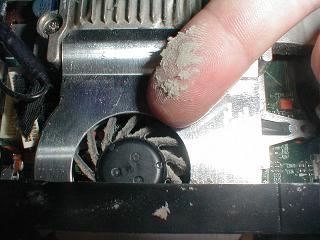
The guts of a laptop are crammed into such a small, cramped space, that the cooling fan is absolutely critical. A replacement laptop fan and heat pipe should cost well under $50, you may even get by with a generic fan replacement for a few bucks, but the job is fairly involved and differs from manufacturer to manufacturer. I don't get excited about noisy laptop fans, I had one in my Toshiba Satellite that got noisy within a year of my buying it and continued noisy for the next four years without failing. On the other hand, you don't want to wait until you get heat damage to replace the fan. If the fan gets increasingly noisy over time or starts noisy (and slow) then quiets down as it picks up speed, I'd replace it at the first opportunity. Assuming you've owned the notebook for a while, you should be familiar with how long the fan usually takes to come on and how long it runs. If the fan never comes on, unless you're working in a freezer, it's probably dead. I just did a page on troubleshooting laptop CPU overheating problems and inspecting the laptop fan for linting or failure.
|
|
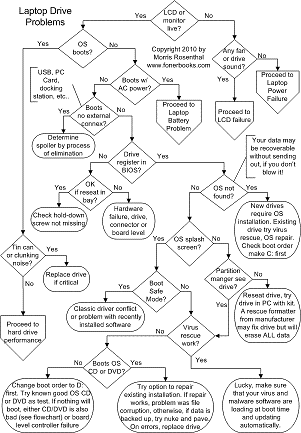
Hard Drive Failure
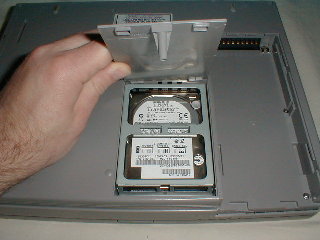
Fortunately, laptop hard drives are the one really generic part (aside from most memory) that you don't have to worry too much about replacing. I just pricewatch or call dirtcheapdrives and buy the closest capacity match, which is usually somewhat larger. Depending on the model, you may be able to really upgrade to a much bigger drive on a replacement, but you probably won't get the benefit of a faster interface on an older notebook and the BIOS may not recognize most of the capacity, so there's no point in spending much more than you have to. Laptop hard drives can be extremely easy to replace or moderately difficult. The difference lies in how they are accessed. Many older notebooks allow you to replace the hard drive through a single-screw access panel on the bottom of the unit, sometimes it's right under the battery or the RAM. Other laptops require that you crack the body open, remove the keyboard or the motherboard (assembly varies from manufacturer to manufacturer), really take the whole thing apart. The interface for the IDE cable on the drives that come out easy is often fixed in place, so the drive basically plugs in, while the drives that require you to take the whole thing apart often make remove the connector on a flexible (and fragile) flat cable before removing the drive.
|
|
Ports and Power Connector
Laptops are sometimes plagued by internal failure of the physical connectors, like the modem or network port seems to be detached within the case, making it tough to get a good connection, or the power connector solder joint to the board breaks. The only way to fix these problems is to open up the body of the laptop, determine exactly what has broken, and do your best to restore it to the original condition, rather than just kludging it. The problem with kludging anything in a notebook is that the tolerances are so tight that your kludge might fail as soon as you snap the case back together. When soldering anything on a laptop board, use a fine tip iron and don't gamble on overheating the board and stripping away circuitry. Use a decent solder sucker to quickly clean up the old solder rather than fooling around with copper wick, and if you get the feeling you're taking to long, just stop and let it all cool down before trying again.
|
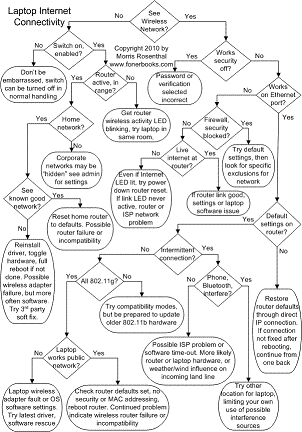
Wireless Internet Connectivity
Modern laptops are all sold with built-in wireless adapters. Some power notebooks used by corporate road warriors will have powerful cellular adapters that connect the laptop to the Internet via the cell phone infrastructure, but the standard built in adapter is an IEEE 802.11b/g wireless transceiver that allows the laptop to connect to local wireless routers and access point within a hundred feet or so. The signal strength is proportional to both the distance between the router and the notebook, and the stuff inbetween, like doors, people, walls, etc. That said, the main hardware issue you'll run into with a wireless Internet connection is the wireless adapter in the laptop being switched off! The vast majority of the time, Internet connectivity problems will be due to operating system software settings or router security settings. The easiest way to troubleshoot whether your connectivity problem is dependent on your local network is to take the laptop somewhere else and try it.
|
Laptop Troubleshooting Flowcharts | If It Jams Home | Contact