|
The Omni Project
If It Jams Home
|
|
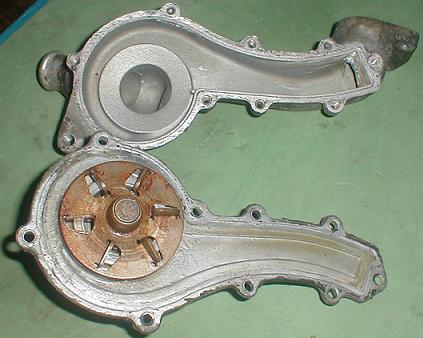
After 282,000 miles, the original water pump on my Dodge Omni, 2.2 liter
naturally aspirated (carbureted) engine, started dripping coolant out the
weep hole. This was accompanied by the temperature gauge making excursions
into overheating territory, which for this car, means anything above the
crotch in the center of the temperature gauge symbol. I never knew what the
little symbol is supposed to stand for, but it looks rather like the engine
vacuum switch that's mounted on top of the thermostat housing. The picture
to the right shows the failed water pump separated from the housing, both
looking as clean after 26 years as only aluminum can. I should also mention
that the bearings had begun to chirp a couple weeks before, a little WD-40
stopped the chirp and possibly damaged the seal, but better to have a slow
drip and replace it than to have the pump seize up, burn the belt, and end
up needing a tow.
|
|
|
In any case, I bought a new water pump from AutoZone, because the remanufactured
pump was a week away ,and the new pump would arrive the next day, the day
before Christmas. I also ordered a gasket and an O-ring for where the housing
bolts to the block inlet, though it turned out that teh AutoZone pump came
with its own gasket and O-ring. Since the main part of the job on this car
is taking off the alternator and the alternator bracket and it was freezing
out, I went ahead and did that, then removed the pump housing, which is just
four bolts. There was a little crud built up in the housing, which I removed,
and cleaned the surprisingly rough gasket surface. The original 26 year old
RTV was still rubbery and mainly held together, despite being a pretty thin
film. The shop manual also called for RTV, a 3 mm bead around the narrow
edge of the pump, plus a circle around each screw. But the pump I bought
from AutoZone came with a gasket, so I figured I'd go ahead an use that with
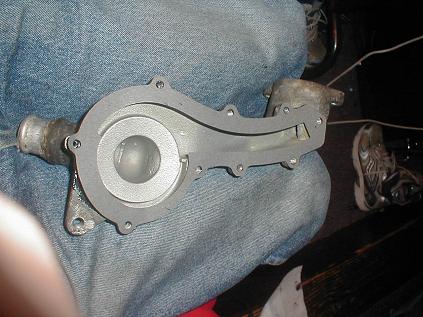
a little Permatex 2B gasket maker/sealer for insurance. The gasket, shown
installed on the housing to the left, was huge, hanging at least a quarter
inch into the pump.
|
|
Interestingly enough, a different replacement water pump I saw at NAPA also
featured a wide gasket. I wish I had stopped at this point and ordered a
remanufactured original pump instead, but I went ahead an assembled the parts
and put it back on the car. The width of the gaskets is a tip-off that the
pump isn't an exact match, most of the gasket will end up just submerged
and flopping around in the housing. I wouldn't be surprised if the wide gasket
ends up acting as a wick for antifreeze. After a couple short highway trips
it began to leak, which I attributed to a bad match between the water pump
and housing which I had noticed once the pump was together, but didn't have
any way to deal with on the day before Christmas. But I did something else
wrong, in that I didn't give the Permatex four hours to set-up to become
"operational" as they put it on the data sheet. It probably got an hour at
max to set-up inside, before I took it out in the freezing cold, put it back
on the car, and filled it with anti-freeze. The Permatex gasket maker is
a very slow dry, requiring 24 hours at room temperature to cure completely.
|

|

|
At the same time, I noticed that the bolts (officially screws) were surprisingly
loose, looser than I had originally made them up. And I'll admit I over-torqued
them to start with, since I was using a gasket rather than the RTV that Chrysler
recommends, along with less than 10 ft-lbs torque. In re-torqueing the bolts
I could get at with the pump n the car, I felt one start to strip. The slow
drip didn't clear up and I was still seeing the temperature gauge make these
excursions into overheating territory before the thermostat opened, so I
took the whole thing apart again to see if the replacement pump was so far
off to be unusable. The picture below shows the pump casting extending a
good quarter of an inch past the edge of the housing, though the camera angle
makes it look even worse. Also note how clean the edge between the pump and
housing looks because I only applied a film of Permatex with my finger. The
second time around I went much thicker and made a real mess.
|
|
Before anybody writes to tell me that you have to remove the engine vacuum
switch from the thermostat housing to backfill the the system so there isn't
an air pocket at the top of the engine, I know. I found that out ten years
ago when I had a small head gasket leak and was getting air into the water
passages in the head. This leaves the thermostat slug only partially submerged,
so it doesn't open unless you get the car pointed down a steep hill or slam
on the brakes enough times to slosh hot antifreeze on it, at which point
it opens and everything goes back to normal until the next cold start. Before
I found the head gasket leak, my fix was to drill a small hole in the thermostat
to keep the air pocket from building up, and I've done that again now to
troubleshoot the overheating, though I only used a wire size drill. The picture
to the right shows the second place where the pump casting doesn't align
with the pump housing by close to an eighth of an inch. You can also see
how dry I assembled the pump because there's no Permatex coming out the end
of the screw holes and very little on the protruding edge.
|

|

|
The picture to the left is the same view of the Autozone water pump with
the Fel-Pro replacement gasket that I bought separately from the pump. I
thought this was important to show because the Fel-Pro gasket turned out
to be an exact match for the housing, so laying it on the new pump makes
the casting difference obvious. Of the two places the casting doesn't line
up, the one to the left bothers me more than the one below because the gasket
surface is narrow on both the housing and the pump at the point to the left,
which is near the top of the pump where it gooseneck comes off the housing
to bolt to the engine. And this section ends up hidden under the edge of
the timing cover behind the camshaft pulley, so you can't even get a look
at it on the car.
|
|
The gasket misalignment to the right down in the impeller section of the
pump is less of a concern, because as you can see, the entire gasket lands
on the aluminum lip of the casting. What I didn't notice when I first put
the pump together was that this section of the gasket surface of the casting
on the new pump is twice as wide as the same section on the original, as
shown below. If this hadn't been the case, I wouldn't have tried reusing
the pump, which is apparently a universal replacement for a pump housing
that changed slightly through the years. You can see this to the left, with
the new pump shown above and behind the same section of the old pump. I just
wish they'd done the same thing for the section shown above. Here's a trick
I discovered that saves having to back off the alternator belt tensioner
and then retension the belt after reinstalling. You can easily pull the three
bolts that keep the pulley on the water pump while it's still on the car,
and remove the belt. Then, when the pump and the alternator are back on the
engine, you just stick the pulley back on the shaft that protrudes a quarter
inch from the pump, line up the bolt holes and put them back in, There's
no struggle or risk of damaging the threads because the shaft holds the load.
|

|

|
When I put the pump back together again with the narrow gasket intended for
the correct pump casting and a ton of Permatex that's probably turning my
antifreeze black as we speak, I gave the impeller a spin and it heard it
hitting the housing,- tink, tink, tink. So apart it came again, another clean-up
and another layer of Permatex, and this time it didn't make noise. Even with
the nine bolts, the pump has wiggle room on the housing! I also replaced
the bolt in the stripped hole with another 6 mm bolt that was a quarter inch
long. I had planned to put a nut on the other side, but the housing was in
the way and it seemed to gain some traction from the extra thread at the
end of the hole, so I'm hoping the loctite and Permatex keep it in place,
though I won't be surprised at this point if they neutralize each other,
or combine to create some liquid that eats aluminum. If it starts leaking,
I think I'll try it one more time using RTV and letting it cure inside for
24 hours like the shop manual instructs. I did give the Permatex 2 gasket
maker about eighteen hours to set-up, but most of that was outside in below
freezing weather. But the mating surface, the ridge around both the pump
and the housing, is just to narrow to allow for much of a mismatch, so a
remanufactured original Dodge water pump may be the only fix..
|
|
