
- Step 1: Preparing the case
- Step 2: Installing the CPU
- Step 3: Installing RAM
- Step 4: Installing the Motherboard
- Step 5: Making Motherboard Connections
- Step 6: Installing an SATA two drive array
- Step 7: Installing Adapters, Nvidia GeForce PCI Express
- Step 8: Finishing the hard drive array
- Step 9: Installing the DVD recorder
- Step 10: Closing up and CMOS Setup
Copyright 2018 by Morris Rosenthal
All Rights Reserve
Build Your Own PC - Step 10: Closing up and CMOS Setup
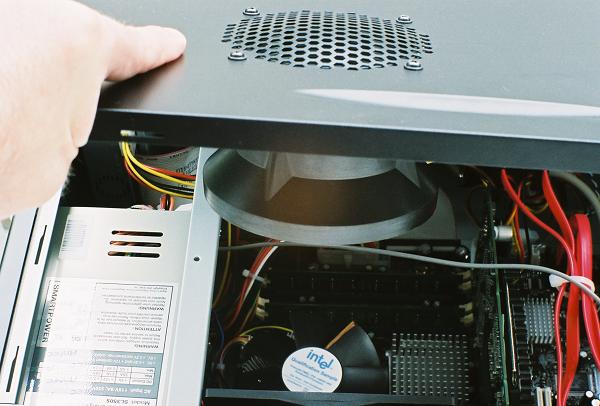
Before closing up the case, lift it a few inches off the table and tilt it slowly back and forth, listening for any loose screws rolling around. If you hear something suspicious, stop and find out what it is. As we replace the side cover on our Antec midtower, you can see the special circular hood that gets positioned over the CPU heatsink fan, giving it a direct path to outside air through the side. The side cover is secured with two thumbscrews.
Figure 68: CPU heatsink fan hood
After we hook up the basic I/O devices, monitor and power (See Chapter 3), we're ready to enter CMOS Setup and configure our hardware. The main setup screen shows our Pentium 4 560 at 3.6 GHz, and correctly identifies the memory speed as 533 MHz (PC2-4300). The memory mode is dual channel, and the Slot 0 of both channels A and B location is populated with a 512 MB DDR2 module.
Figure 69: Main screen in the BIOS Setup Utility

Most of the options for BIOS Setup are under the Advanced menu. The defaults are fine in most cases, though it's a good idea to take a look at each screen just to make sure you're getting what you expected. If you have trouble when you go to install the operating system, try changing the Boot Configuration to make the CD or DVD drive the first boot device.
Figure 70: Advanced options in the BIOS Setup Utility

We chose to show the Drive Configuration screen, in part to show how terminology evolves over time. The Memorex DVD recorder is shown as the PATA Master, where PATA stands for Parallel ATA. Although the parallel ATA technology has been around for over ten years, nobody ever called it PATA until Serial ATA was recently introduced! We enabled the Intel RAID controller while here, the default was dissabled.
Figure 71: Drive Configuration screen

Our final stop in the BIOS Setup utility before saving and exiting is the Hardware Monitoring screen. It's always a good idea to stop on this screen for a few minutes to make sure that the CPU temperature reaches a plateau and stabilizes, and that the power supply voltages are stable. It's OK for a power supply voltage to flip back and forth between two values, which are approximations in any case, but it shouldn't wander through a whole series of different values.
Figure 72: Hardware Monitoring screen
